
AI agents are going to reshape the internet landscape. These powerful programs are more than just AI-driven software; they're intelligent virtual assistants that can autonomously complete online tasks.
It’s like having a digital sidekick that automatically handles repetitive online processes for you – freeing you up to focus on higher-level work.
For professionals across various industries, mastering this technology will be the key to staying ahead of the curve. By leveraging AI agents' ability to run tasks autonomously, you can unlock a new level of efficiency and productivity that gives you a significant edge in today's competitive environment.
In this post, I’m going to go over the process of building custom workflows using HyperWrite’s Assistant Studio. This detailed guide will prove that you don’t need to be a master coder or have previous experience working with AI agents. HyperWrite’s workflow builder is simple, intuitive, and 100% user-friendly.
Let’s dive in and discover how easy it can be!
Part 1. Recording A Workflow
Step 1 - Install HyperWrite Extension.
Before you begin, make sure you’ve downloaded and installed the HyperWrite Extension. Once you’ve done that, you should see a small HyperWrite icon on the bottom right side of your screen.

Step 2 - Click the HyperWrite icon to start recording a workflow.
How it Works: When you run the HyperWrite extension to create a workflow, HyperWrite’s system captures everything happening on your screen – every word you type, every page you visit, every button you click. But don’t worry; once you stop the recording, HyperWrite stops capturing.
A small window on the bottom right of your screen will pop up. You’ll be able to see two tabs at the top of this window: Agent and Chat. In this instance, select Agent.

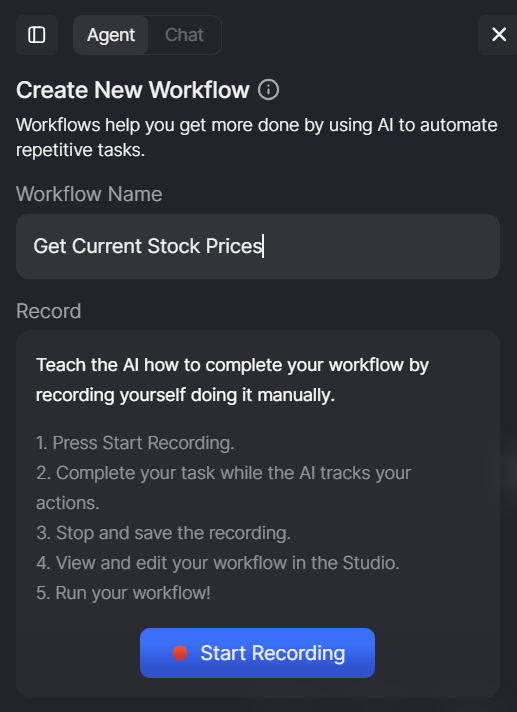
Step 3 - Under Agent, select the New Workflow option, then click + Create Workflow.
Once you’ve done this, enter the name of your new workflow. Make sure it’s something related to the task you want to automate. For instance, “Get Current Stock Prices” is easier to remember (and far more self-explanatory) than “Workflow 0014A.”
When you’re ready, head on to the next step!
Step 4 - Hit the Start Recording button.
You’ll notice a small black bar on the bottom of your screen that says, “Recording Workflow.” There’ll be a bright red Stop button next to it. As long as this bar is up, it means HyperWrite is capturing your screen.
You should then perform the task you want the HyperWrite AI Agent to automate later on.
Sample Workflow Recording
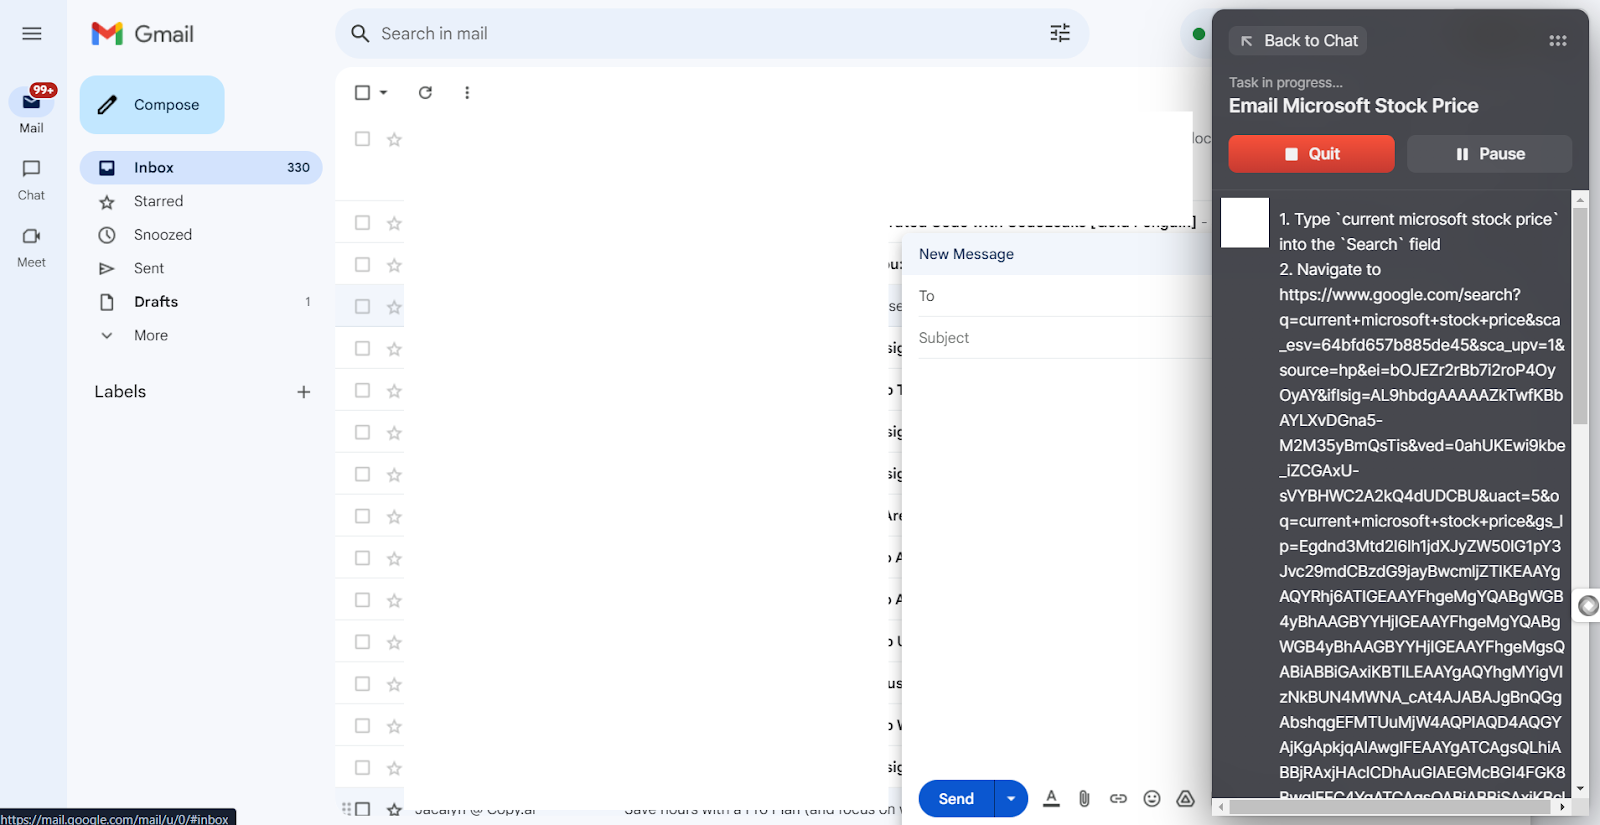
For this example, I want HyperWrite’s agent to autonomously search Microsoft’s current stock price on Google. Once it finds the price, I want it to send the information to my contact in an email.
Here’s how the entire process is done on a browser while the AI is recording:

Navigate to Google and then type the term “current microsoft stock price” in the search bar.

Take note of the current price (in USD).
Then navigate to Gmail and compose a new email. Enter the recipient’s email address and a suitable subject line, like “Current Stock Prices.” For the email body, type out: “Microsoft Stock Price.” Then enter or copy-paste the current price according to Google.
Important note: Check on the recording bar indicator at the bottom of the screen from time to time. Make sure the bar at the bottom reads “Recording Workflow” as you’re performing the task.

Step 5 - Hit the Stop Button once the task is done.
The message on the pop-up bar will then prompt you to save your workflow. You can either Delete it (if you made a mistake during the recording and want to start over, for instance) or Save it.

If you’re happy with the workflow, hit the Save button. This will take you to HyperWrite’s AI Assistant Studio where you can review it.
Step 6 - Study the parts of your workflow in the studio.
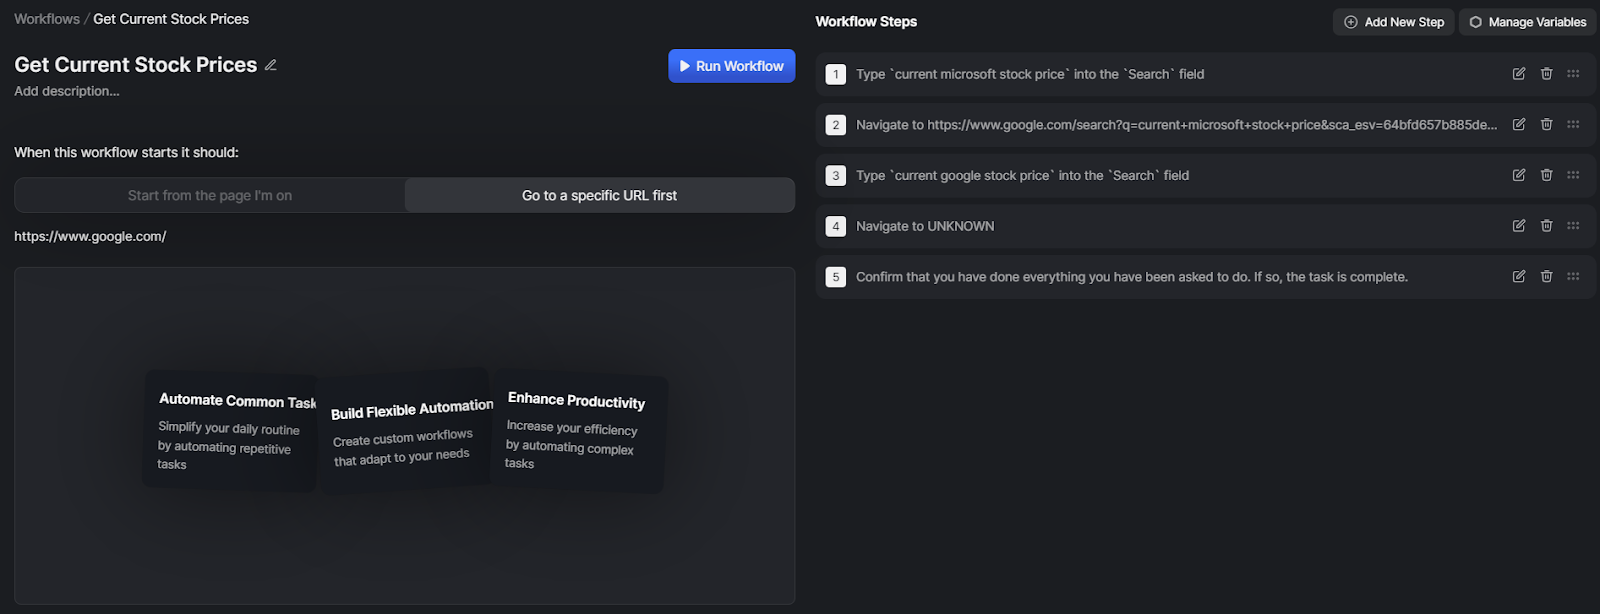
There are two parts you need to review:
- What the Workflow Does When it Starts.
On the left side of HyperWrite’s Assistant Studio, you’ll see the following line:
“When this workflow starts it should:”
Beneath that, there are two options: (1) start from the page I’m on, and (2) go to a specific URL first.
- Start from the page I’m on. This option is applicable for workflows that don’t depend on a specific website or web application to run. Like a workflow that’s designed to extract email addresses from webpages, for instance. You can go to any site’s Contact Us page and run the workflow as normal.
- Go to a specific URL first. This option is applicable for workflows that depend on a specific website or web application to run. Like a workflow designed to order you pizza, for instance. It can’t just start ordering a pizza on any site. It needs to navigate to the pizza place’s Order Page first.
Review your workflow and decide which starting point is best. Usually, HyperWrite’s already figured it out based on what it recorded, but it never hurts to double-check.
- The Workflow Steps.
On the right side of the Assistant Studio is a numbered list of instructions. These are the different commands given to HyperWrite’s AI agent. The agent autonomously conducts the workflow by following the commands in order. So if the steps are numbered as so:
- Open email inbox
- Click ‘Compose’ button
- Type ‘Hello World!’ in ‘Subject’ field
… the agent will need to open the inbox first before it types “Hello World!,” and it cannot click the ‘Compose’ button after it’s typed the subject.
Part 2. Editing A Workflow
You’ll notice that some steps and sections of the workflow outline don’t seem right. That’s totally expected. There are a lot of factors that can affect how the screen recording is translated into actionable commands that AI agents can read and understand.
For instance; speed and clarity.
If you perform the workflow too fast during the recording, the AI might not be able to keep up. Website complexity is also another issue. Some sites like Google Sheets and Notion have limited compatibility with HyperWrite due to their complexity.
This is why you need to edit your workflow before you run it. Even with zero coding knowledge and experience, users can easily debug workflow scripts via the Assistant Studio.
Here’s how:
Step 1 - Determine the workflow’s starting point.
I explained the difference between the two options (“start from the page I’m on” and “go to a specific URL first”) in Part 1. If the current settings match the workflow’s correct starting point, you’re good to go. If they don’t, manually set the point yourself.
For our example, we want the AI to use Google Search to get the latest stock price. This means this workflow is dependent on Google Search. The agent can’t run a search query on just any random website after all.

Given this, I’ll select the Go to a specific URL first option. Then, below that, I’ll input the URL of the website it needs to navigate to.
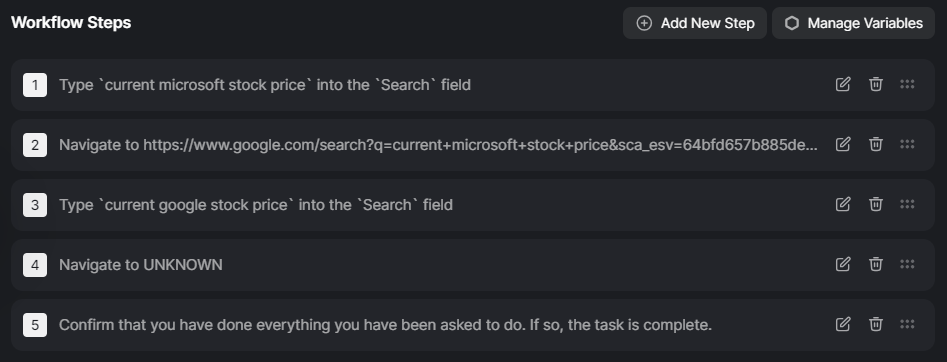
Step 2 - Review each step under the Workflow Steps section.
You need to focus on two things:
- Order
- Clarity
In order for the agent to autonomously perform your workflow successfully, the instructions need to be (a) clear, and (b) in the right order. You can’t prioritize one over the other. Even if all the steps are sequentially correct, the AI can’t perform them if it doesn’t understand them. And vice-versa; the AI could end up skipping steps and achieving something completely different if the instructions – even though perfectly worded – aren’t in the proper order.
Important Note: I recommend having this page open at all times when you review the steps – especially if it’s your first time working with an AI agent. This guide outlines the basic process for recording a workflow. It also contains common commands and actionable text you can copy to ensure HyperWrite understands your directions.
Step 3 - Click on a step to edit it.
If there’s a step with instructions that are almost correct – save for some errors, typos, etc. – click on the offending step to open the text field. It should look like this after you click it:
Step 4 - Click on the text in the newly opened text field to edit it.
Step 5 - Add missing steps with the Add New Step button.
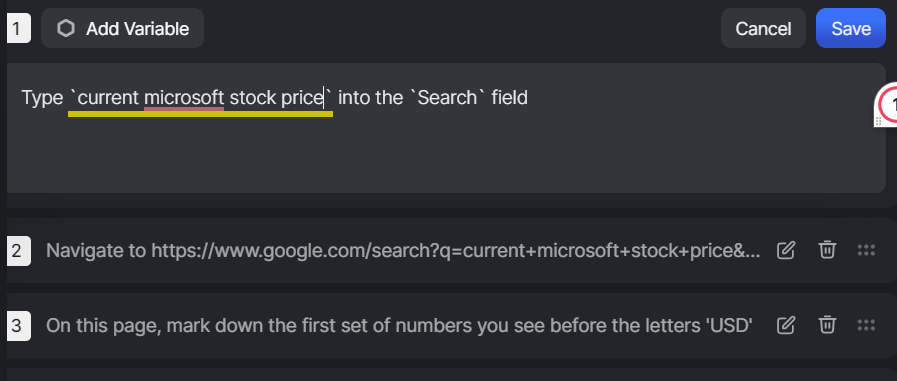
Scroll to the bottom of the Workflow Steps section and click on the Add New Step button. If you find that parts of your workflow lack instructions or you think the system could benefit from a sort of transition step between two specific commands, simply add new steps as needed.

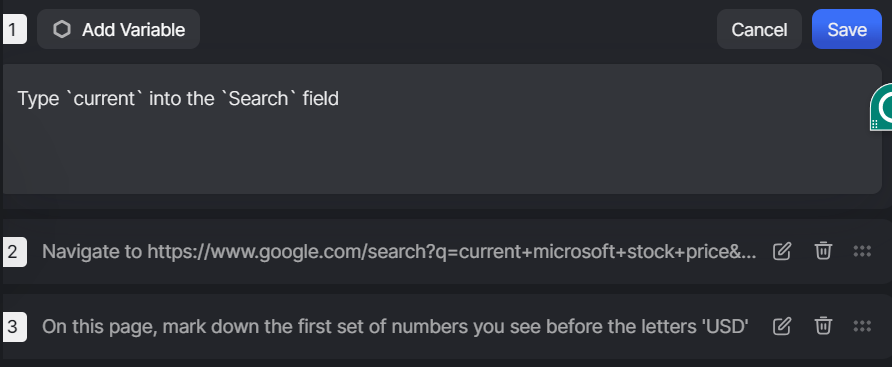
In this example, there’s a potentially missing step between Steps 3 and 4. The Agent is told to “mark down” (i.e., remember) the first set of numbers it sees on the page, before the letters USD. It is then told to click the ‘Compose’ button to create a new email.
In order for the agent to compose a new email, it needs to first navigate to the user’s email inbox. Otherwise, it will end up looking through Google’s SERP (search engine results page) for a ‘Compose’ button to click on.
For this example, I’ll add a new step. A new text field should pop up at the bottom of the list. Enter the directions for the additional step and click Save.
Step 6 - Hit the Save button.
You should do this every time you add a new step or make an edit to an existing one.

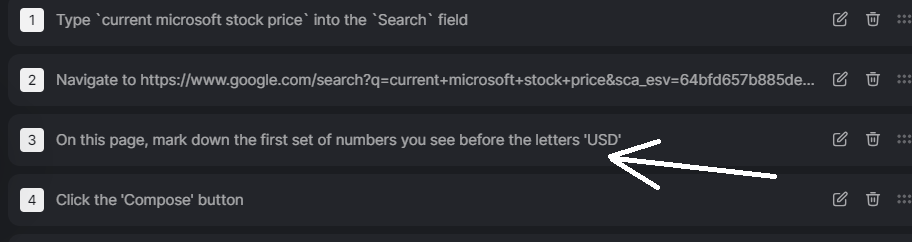
Step 7 - Move new steps to their correct placement.
This also includes rearranging existing steps as needed.
- Moving new steps. When you add a new step, it automatically gets numbered as the last step on the list. If this isn’t where it should be, you can move the step to its correct place using the group of six small dots at the far right. Just hold it down and drag the bar wherever it’s needed.

- Rearrange existing steps. If some steps aren’t in the right place, you can create a new sequence by rearranging them. Just follow the same procedure; six dots, hold down, drag around.
Step 8 - Edit step instructions according to HyperWrite’s recommended terms and structure.
So here’s the thing … According to the HyperWrite Assistant Studio guide, their AI assistant can actually only learn two things: Click and Type. All other actions or interactions – like “scroll” or “copy and paste” – don’t register.

So if your workflow includes any of the following actions:
- Copy & Paste
- Direct URL Navigation
- Go Back or Forward
- Scroll
… you’ll need to do the recommended workarounds.
Workaround Example. In our sample workflow, I can’t ask HyperWrite to “copy” Microsoft’s current stock price from Google's SERP “and paste” it into the email message.
So, following HyperWrite’s guide, I phrase the copy and paste command like so:
- Copy (Step 3) → “mark down the first set of numbers you see”
- Paste (Step 8) → “write the number you found in Step 3”

Step 9 - End the workflow by asking the AI agent to confirm the task is complete.
To optimize the workflow and minimize bugs, indicate a clear ending. Don’t let the last step be an actionable step (i.e., “click ‘Send’,” or “type “thank you!”). Instead, verify that the AI has successfully followed all the instructions. If it has, it can end the workflow. If it hasn’t, let it run through the process again.
For instance:

This prevents the workflow from potentially performing the same task multiple times.
Part 3. Testing & Debugging
Once you’ve finished editing your workflow, you’ll need to test it for potential bugs.

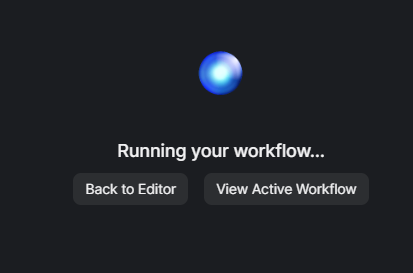
Step 1 - Hit the blue Run Workflow button.
A new page will pop up with this message in the center:
Since we’re testing the workflow, click the View Active Workflow option. Another page will pop up.
On the side of the new page, you should see a small window with your workflow details listed. The name of the workflow is on top with Stop and Pause buttons beneath that. The steps of your workflow will be listed below it.
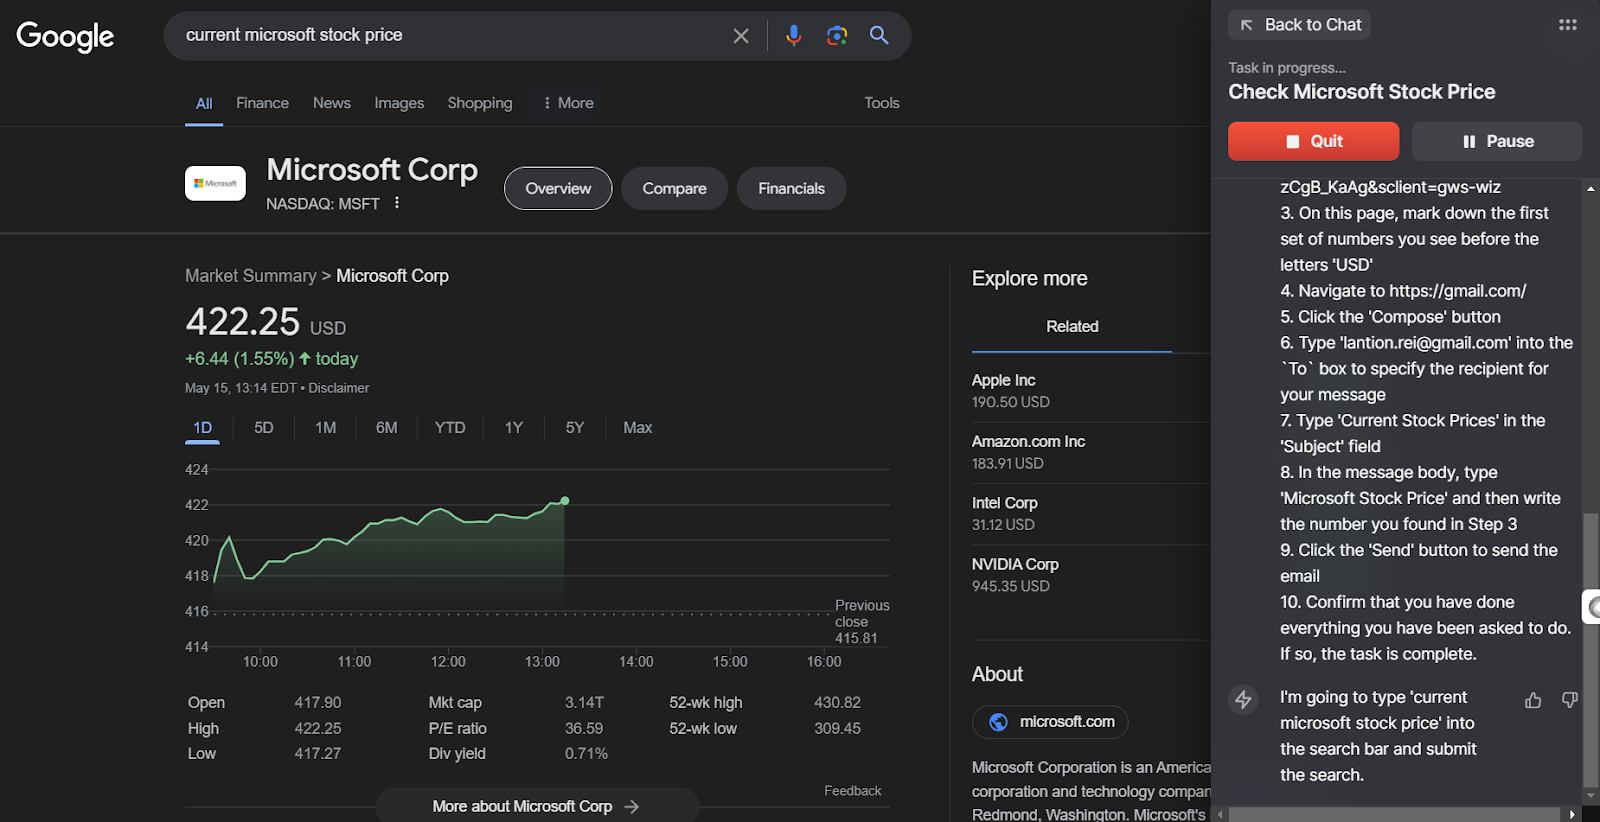
Step 2 - Allow the workflow to run and observe what’s happening on the screen.
You should see things moving independently – like the browser loading the specified URLs without prompting and information details being autonomously entered in the right fields.
Once the workflow has run its course, the window will automatically close.
If your task was successfully completed, congratulations! You’ve just built your first workflow.
If your task was not completed, run the workflow again.
This time, compare what’s happening on the screen to the step currently being conducted. If what’s happening on screen doesn’t match the step’s instructions, you’ve found a potential bug in your program.
First, pause the workflow so that you can review the instructions specified in the step.

Note how the on-screen task differs from what was stated in the step. For example, did it type the wrong thing? Did it not type anything at all? Did it type something in the wrong field?

Select the step with the error and provide feedback for it. Describe what went wrong. This won’t fix the step but it will help HyperWrite improve its AI agent.
Option 1. Basic Troubleshooting
Check the following guides:
These contain some sample instruction text and troubleshooting tips. For instance, if the agent missed a step, this guide recommends breaking down that step into two or three smaller tasks with more detailed instructions.
For example:
Type ‘EOD Report’ and then the current date in the ‘Subject’ field then send the email
Becomes:
Step 1: Click on the ‘Subject’ text field
Step 2: Type ‘EOD Report’ and then the current date
Step 3: Click the ‘Send’ button to send the email
Specificity can help the AI agent perform longer and/or more complex tasks.
Option 2. Re-recording
In most cases, the error lies in the way the user phrased the instructions. HyperWrite’s agent follows very specific terms. So it may not recognize certain variations or synonyms of commands (ex. doesn’t register “note” to mean the same thing as “remember” or “markdown”).
Ergo, if Option 1 doesn’t work, try recording the problem part of the workflow again. This can help you review how HyperWrite describes the actions needed for that step.
Let’s use our earlier example.
Say HyperWrite clicked the ‘Support’ button instead of the ‘Compose’ button. Yet your instructions clearly say, “click the ‘Compose’ button.” To correct this, you need to see where your and HyperWrite’s verbiage differed:
Step 1. Set up your browser so that it’s open in your inbox. Run the HyperWrite AI Agent and create a new workflow (make sure to name it something different from your original workflow). Hit record.
Step 2. Carefully go through the process of moving your cursor over to the ‘Compose’ button. Click it. Wait a few seconds, then stop the recording.
Step 3. Save the new workflow so that you can review it in the studio.

Remember to go slowly. As HyperWrite puts it, the “more time the AI has to see what you’re doing, the better it will understand the task.”
Step 4. If the step was successfully recorded, you should see how HyperWrite typed it out.
Example:
Your Original Instructions: Click ‘Compose’ to start a new email.
HyperWrite’s Instructions: Click the ‘Compose’ button to start writing a new email.
Step 5. If HyperWrite’s instructions are different from how you originally phrased the task, replace your instructions for that step with HyperWrite’s copy. Review HyperWrite’s instructions and note the differences for future reference.
Step 6. Save the new workflow. Run it again. If it works this time, then you know it was a syntax error.
Final Thoughts & Reminders
As with all things, practice makes perfect. Building a successful workflow with the HyperWrite Assistant Studio may take time – and a lot of fine-tuning. Be prepared to iterate numerous steps and refine multiple processes along the way.
But don’t be discouraged! AI agents are a powerful technology, and the rewards are well worth the investment.
Just remember to (1) explain your reasoning, (2) start simple, and (3) strive for clarity. When giving HyperWrite instructions, act like you're teaching someone a new skill. Explain the reasoning behind each specific step to help the AI grasp the underlying logic of it (rather than programming it to simply memorize a sequence of specific actions).
And for your first couple of workflows, keep things simple and start with workflows containing seven steps or less. The more steps you have, the more elements you have to review, edit, and troubleshoot. If you’re going to have HyperWrite’s AI agent do complex tasks, you can always just chain multiple 7-step workflows together.
Lastly, clarity is key. The clearer your instructions, the better the AI can follow them. Use simple, straightforward language that leaves no room for ambiguity or misinterpretation.
Truly, AI agents are the gateway to a new way of working. With the HyperWrite Assistant Studio handling your repetitive tasks, you’re free to focus on projects that require creativity, critical thinking, and out-of-the-box reasoning.
HyperWrite is the AI writing assistant that learns your style. It handles drafting, editing, and researching so you can focus on ideas.
- Autocompletes sentences as you type
- Works inside Google Docs & Gmail
- Adapts to your personal writing style
- 500+ AI tools for any writing task
Powerful writing in seconds
Improve your existing writing or create high-quality content in seconds. From catchy headlines to persuasive emails, our tools are tailored to your unique needs.